
How to Get a Document Notarized in Canada
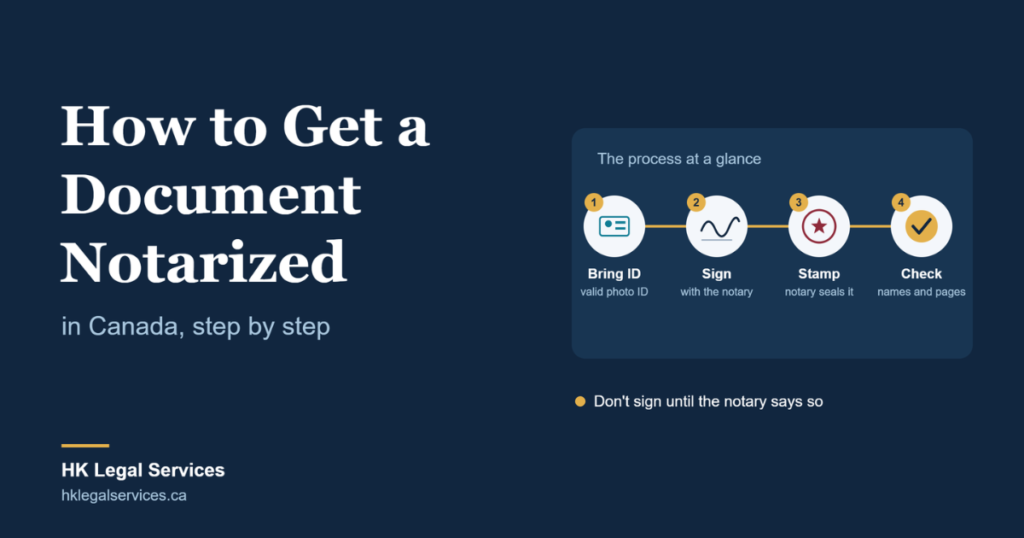
You’ve been told a document needs to be notarized, and you’re not sure where to start. Who do you go to? What do you bring? Do you sign first, or later? These are the questions we hear most, and the answers are simpler than they seem once you know the order of steps. This guide walks you through the whole process, from checking what the receiving office wants to what to do after you leave the notary’s office. It also covers the mistakes that cause most delays, so you can get it right the first time. The Short Answer: How Do You Get a Document Notarized in Canada? To get a document notarized in Canada, follow these steps: Fees and appointment availability vary by notary and province, but with the right preparation, most simple documents take under half an hour. Step 1: Confirm What the Receiving Party Actually Needs Before you book anything, find out what the person or organization asking for the document expects. “Notarized” can mean different things depending on the situation, and a quick check now can save you from doing it twice. Ask them: If you can, get their requirements in writing. It protects you if anything gets rejected later. Step 2: Identify the Type of Notarial Act You Need Notaries do a few different things, and knowing which one applies helps you prepare properly. In our guide on what a notary public does in Canada, we cover each in detail, but here’s the short version: Witnessing a signature. You sign a document in front of the notary, who confirms your identity and that you signed. Common for powers of attorney, consent letters and agreements. Administering an oath or declaration. You swear or affirm that the contents are true. Common for affidavits and statutory declarations. Certifying a copy. The notary compares a copy against your original and certifies it as a true copy. Common for passports, diplomas and ID documents. Each one has slightly different preparation. For a signature or oath, you bring an unsigned document. For a certified copy, you bring the original (and often a copy, though some notaries make it themselves). Step 3: Prepare Your Document A well-prepared document makes everything faster. Here’s what to do. Complete it, but don’t sign it. Fill in all the blanks, check names and dates, and make sure every page is there. The notary has to watch you sign, so leave the signature line empty. Use a clean, final version. Avoid correction fluid or handwritten changes. If something needs fixing, print a new copy. Check the details match your ID. Names, spellings and dates should match your government-issued ID. A small mismatch, such as a missing middle name, can cause delays or rejection. Bring all pages and attachments. If the document has exhibits or schedules, bring them in the right order. Notaries often need to see the whole document, and some will stamp every page or attach a certificate. Bring extra copies if you need them. Some people notarize two or three copies at once, especially for travel or applications that need originals in more than one place. Don’t staple or unstaple after notarization. Once a notary has stamped and assembled a document, changing the pages can invalidate it. If your document isn’t in English or French, tell the notary in advance. A notary generally has to understand what they’re notarizing, and many won’t certify something they can’t read. You may need a certified translation first. Step 4: Gather Valid ID Identity checks are the heart of notarization, so this step matters more than most people expect. Bring valid, government-issued photo ID. Common acceptable options include: The ID should be current. Expired ID is usually refused. If you’ve changed your name, bring supporting documents such as a marriage certificate or change-of-name certificate, and tell the notary ahead of time. Some notaries ask for a second piece of ID in certain situations, so it’s worth asking when you book. If the signer has no photo ID at all, the notary may have alternative procedures, but it’s up to them, and not all will proceed. Step 5: Find and Book an Authorized Notary Not every person with a stamp is authorized to notarize, so check before you book. In common-law provinces (such as Ontario, Alberta and Nova Scotia), notaries public are typically appointed or recognized by the province, and in many cases the notary is also a lawyer. In Ontario, for example, many notarizations are done by lawyers. You can learn more through your provincial law society, such as the Law Society of Ontario. In British Columbia, notaries public are a separate regulated profession, overseen by the Society of Notaries Public of BC. In Quebec, notaries are civil-law notaries regulated by the Chambre des notaires du Québec, and their role goes beyond what a common-law notary does. When you contact a notary, ask: Choosing someone with experience in your type of document makes a real difference. For example, a notary who regularly handles documents for use overseas will know what foreign offices expect. Our Notary Services team can review your document before the appointment so you know what to bring and what to expect. Step 6: Attend the Appointment Here’s what a typical appointment looks like. Be patient with the questions and checks. They’re not being difficult. Each step protects you and the document from fraud and later challenges. Special situations at the appointment: Step 7: Check the Notarized Document Before You Leave Don’t rush out the door. Take a minute to check: Fixing a mistake at the appointment takes seconds. Fixing it later can mean going back to the beginning. Step 8: Take Care of Next Steps Once the document is notarized, you may not be finished. If the document stays in Canada, you’re usually ready to submit it to the bank, court, school, employer or agency that asked for it. If the document is going to another country, you’ll likely need an apostille (for Hague Convention
What Does a Notary Public Do in Canada?

At some point, most people get asked for a notarized document. It might be a travel consent letter for your child, a power of attorney, an affidavit for an immigration application, or a certified copy of your passport. The request usually comes with a deadline, and no explanation of what a notary actually does. This guide explains it in plain language: what a notary public does in Canada, what they can’t do, how the role differs from province to province, and what to expect when you book an appointment. The Short Answer: What Does a Notary Public Do in Canada? A notary public is an official who acts as an impartial witness to important documents. In Canada, a notary public verifies your identity, witnesses your signature, administers oaths and declarations, and certifies copies of original documents as true copies. By doing this, they add a layer of trust, so that banks, courts, government offices and foreign authorities can rely on your document. A notary doesn’t confirm that the content of your document is true or legally sound. They confirm the signing process: who you are, that you signed willingly, and that the signing happened in front of them. What Is a Notary Public? A notary public is someone authorized by law to carry out certain official acts, called notarial acts. Think of them as a trusted neutral party. They have no stake in your document. Their job is to make sure the formalities were done properly. When a notary completes a notarial act, they usually sign the document, add their official stamp or seal, record the date and place, and in many cases write the details in a notarial register. That record is part of what makes notarization reliable. If anyone questions the document later, there’s a trail showing what happened. The Main Things a Notary Public Does 1. Verifies your identity Before anything else, the notary checks that you are who you say you are. That means looking at valid, government-issued photo ID, such as a passport, driver’s licence or permanent resident card. Notaries are careful about this because the whole point of notarization is to prevent fraud and impersonation. If you can’t show acceptable ID, a notary may refuse to proceed. That isn’t personal. It’s a requirement of the role. 2. Witnesses your signature For many documents, the notary has to see you sign. You sign in their presence, and they confirm that it happened. This is why you should never sign a document before the appointment. If it’s already signed, the notary generally can’t witness it, and you may have to start again with a fresh copy. 3. Administers oaths, affirmations and declarations When a document needs to be sworn or affirmed, like an affidavit or a statutory declaration, the notary administers the oath. You promise that what you’ve written is true, and the notary records that you did so. Making a false statement under oath can have serious legal consequences, so the process is taken seriously. 4. Certifies copies of original documents A notary can examine an original document and certify that a photocopy or scan is a true copy of it. This comes up often with passports, diplomas, identity documents and contracts. There’s an important catch. Some institutions and authorities don’t accept notarized copies of certain documents, and some notaries won’t certify copies of certain public records. Vital records like birth certificates are common examples. Always check what the receiving party accepts before you book. 5. Prepares documents for use outside Canada Notarization is often the first step for documents going abroad. For countries that belong to the Hague Apostille Convention, the notarized document is then sent to a government authority for an apostille, which confirms the notary’s signature is genuine. Canada joined the Convention on January 11, 2024. You can see the official member list on the HCCH apostille page. If you’re not sure how the two steps fit together, our guide on apostille vs notarization explains the difference and the right order to follow. Notary Public vs Commissioner of Oaths vs Lawyer These roles overlap, which is why people get confused. A notary public performs notarial acts and, in most provinces, is recognized for notarizing documents that will be used outside the province or abroad. A commissioner for taking affidavits (or commissioner of oaths) can administer oaths and witness affidavits, usually for use within the province. Their authority is often narrower, and many foreign offices and apostille authorities don’t treat their stamp the same way as a notary’s. A lawyer can give legal advice, prepare documents and represent you. In many provinces, lawyers can also act as notaries or commissioners. When they do, they’re performing a separate function from giving legal advice, and what they can do depends on their licence and the rules in that province. The practical takeaway: if your document is going to another country, a notary public (or a lawyer who is also a notary) is usually the safer choice than a commissioner alone. Ask the receiving office what they accept. How Notaries Differ Across Canada This is one of the most important things to understand, because the role isn’t identical everywhere. Common-law provinces (such as Ontario, Alberta and Nova Scotia). Notaries public are typically appointed or recognized by the province, and in many cases the notary is also a lawyer. In Ontario, for example, most people get documents notarized by a lawyer. Their main role is witnessing, administering oaths and certifying copies. British Columbia. Notaries public in BC are a separate, regulated profession, overseen by the Society of Notaries Public of BC. They’re not lawyers, but they can prepare certain legal documents such as wills, powers of attorney and real estate transfer documents, in addition to notarial acts. Their scope is broader than in most other provinces. Quebec. Notaries in Quebec are civil-law notaries. They’re legal professionals regulated by the Chambre des notaires du Québec, and they draft authentic acts such as wills, marriage contracts and real
Apostille vs Notarization: What’s the Difference?

If you’ve been told your document needs to be “notarized and apostilled,” it’s easy to assume those are two names for the same thing. They aren’t. They do different jobs, they’re done by different people, and getting the order wrong is one of the most common reasons documents get rejected. This guide explains what each one is, how they differ, and how to tell which ones you need. By the end, you should know exactly what to do first and what to do next. The Short Answer: What’s the Difference Between an Apostille and Notarization? Notarization is done by a notary public. They confirm who signed a document, witness the signature, or certify that a copy is a true copy. An apostille is issued by a government authority. It confirms that the notary’s (or other official’s) signature and seal are genuine, so the document can be accepted in another country that belongs to the Hague Apostille Convention. In short: notarization is about the person signing. An apostille is about the official who handled the document. For many documents going abroad, you need both, in this order: notarization first, then the apostille. What Is Notarization? Notarization is a formal step where a licensed notary public (or, in some provinces, a lawyer who acts as a notary) checks and records something about a document. Depending on what you need, they might: A notary also makes sure you’re signing willingly and understand what the document is. They’ll then sign it, add their official stamp or seal, and often record it in a notarial register. What notarization does not do is prove the content of your document is true or legally sound. A notary confirms the signing process, not whether the facts in your document are correct. Who can notarize varies across Canada. In most common-law provinces, notaries public are appointed by the province, and many lawyers hold that status. British Columbia has notaries public who aren’t lawyers. Quebec has its own system of civil-law notaries with a different role. Because of these differences, it helps to use a notary or lawyer who’s in the same province where you’ll apply for the apostille. What Is an Apostille? An apostille is a certificate attached to a public document. It confirms three things: that the signature on the document is genuine, that the person signing had the authority to do so (for example, as a notary or registrar), and that the seal or stamp on the document is authentic. It exists because of the Hague Apostille Convention, an international agreement that simplifies how documents are accepted between member countries. Instead of making you go through several rounds of embassy or consulate verification, one apostille is enough for countries that belong to the Convention. You can see the official member list on the HCCH apostille page. Canada joined the Convention on January 11, 2024. Before that, documents leaving Canada generally had to go through a longer legalization process. An apostille doesn’t verify the content of your document, translate it, or guarantee that the receiving office will approve your application. It only confirms where the document came from. Apostille vs Notarization: Side-by-Side Notarization Apostille What it does Verifies identity, witnesses signatures, certifies copies Verifies the official’s signature and seal for use abroad Who does it Notary public or lawyer-notary Government authority (federal or provincial/territorial) What it confirms The signer’s identity and that they signed That the notary or official is genuine and had authority Where it’s used Within Canada and as a step before an apostille In other Hague Convention member countries Does it prove content is true? No No Comes first or second? First (for private documents) Second Replaces the other? No No The easiest way to remember it: notarization makes your document credible in Canada, and the apostille makes that notarization credible abroad. Why Both Often Go Together Think of it as a chain of trust. Each step proves the one before it. Skip the notarization and there’s nothing for the apostille authority to verify. Skip the apostille and the receiving country has no easy way to check the notary. When Do You Need Notarization Only? Some situations only need a notary, with no apostille, because the document stays within Canada or the receiving party accepts notarization alone. Common examples include: If you’re not sure whether the receiving party will want more than a notary’s stamp, ask them in writing. It saves a lot of trouble. When Do You Need an Apostille Only? Public documents issued by an official body often don’t need a notary at all, because they already carry an official signature and seal. In those cases you can usually go straight to the apostille authority. Examples include: Check the issuing office’s rules first. Some authorities won’t apostille a notarized copy of certain public records, and want the original or a newly issued certified version. When Do You Need Both? You’ll typically need notarization first and an apostille second when the document is a private document, meaning something you or your organization created, or when you’re using a copy. Common cases: If you want to see how the full process works from start to finish, our guide on how to get a document apostilled in Canada walks through each step, including how to find the right issuing authority. The Correct Order: Notarize First, Then Apostille This is the rule that trips up the most people. The apostille authority can only verify a signature it recognizes, and it keeps the signatures of notaries and officials on file. That’s why the order matters. If you sign first and notarize later, the notary can’t witness the signature, and the document may be invalid for your purpose. What About a Commissioner of Oaths? Some provinces also have commissioners for taking affidavits, who can administer oaths and witness certain documents. In many cases, a commissioner’s stamp is enough for Canadian purposes, but it may not work for an apostille. Authorities usually keep signatures from notaries and certain designated
How to Get a Document Apostilled in Canada

You’ve got a birth certificate, a degree, or a power of attorney that needs to be used in another country. The receiving office says it needs an “apostille,” and suddenly you’re dealing with something you’ve never heard of, on a deadline. It’s a common spot to be in, and the process is easier than it first looks once you know who issues the apostille and what they need from you. This guide walks you through it step by step, including the mistakes that cause most of the delays. The Short Answer: How Do You Get a Document Apostilled in Canada? To get a document apostilled in Canada, you need to do five things: Fees, forms and processing times depend on the issuing authority, so always check the current requirements before you submit. What Is an Apostille, Exactly? An apostille is a standardized certificate that confirms a public document is genuine. It verifies the signature on the document, the capacity in which the person signed (for example, a registrar or notary), and the seal or stamp on it. Here’s the part many people miss: an apostille does not confirm that the content of the document is true or accurate. It only confirms that the document came from a real official source. It also doesn’t translate anything or guarantee that the receiving country will accept the document for your specific purpose. Think of it as a passport stamp for your paperwork. It tells officials abroad, “this document is authentic, and you can trust where it came from.” Why Canada’s 2024 Change Matters For many years, Canada wasn’t part of the Hague Apostille Convention. Anyone who needed a Canadian document used abroad had to go through a longer process called legalization. That usually meant getting the document authenticated in Canada, then taking it to the embassy or consulate of the destination country for another round of verification. It was slow, it cost more, and each country had its own rules. That changed when the Convention came into force for Canada on January 11, 2024. For documents going to other member countries, one apostille now replaces the whole chain. If your destination country is a member, you can skip the embassy step. If the destination isn’t a member, the older legalization process may still apply. You can check current membership on the Hague Conference on Private International Law (HCCH) website, which keeps the official list. Step 1: Confirm Your Destination Country Accepts Apostilles Start here, because it determines everything else. It’s also worth asking whether they need a translation. Apostilles don’t cover translations, and many countries want a certified translation done according to their own rules. Step 2: Identify Whether Your Document Is Federal or Provincial In Canada, the authority that issues the apostille depends on who issued or signed your document. Each province and territory runs its own process, with its own forms, fees and delivery options. Quebec, for example, has its own system for notarial acts. Before you submit anything, find the correct office on your province’s official government website. Step 3: Get the Document in the Right Form This step is where most people run into trouble. The apostille authority can only apostille a document it can verify. That generally means one of three things: An original public document. For example, a birth certificate issued by your province’s vital statistics office. Make sure it’s the version the receiving country wants. Many destinations ask for the long-form or full-detail version, and you may need to order a new one. A certified true copy. If you need to use a document that can’t be given up or reissued, such as a passport, you’ll typically need a notary public or lawyer to certify a copy. That certification is what gets apostilled. A notarized private document. Documents like affidavits, powers of attorney, consent letters for travelling with children, and declarations are private documents. They have to be signed in front of a notary public first. The apostille then confirms the notary’s signature and authority. A few practical points: Step 4: Check Special Requirements for Your Document Type Different documents have their own quirks. Here’s a quick reference. Document Usually issued by Typical prep needed Apostille authority Birth, marriage, death certificate Provincial vital statistics office Order the correct (often long-form) version Provincial/territorial authority RCMP certified criminal record RCMP Make sure it’s the certified version, with fingerprints if required Global Affairs Canada University or college degree/transcript Educational institution Certified copy or registrar’s letter, depending on the province Provincial/territorial authority Power of attorney, affidavit, consent letter You, signed before a notary Sign in front of a notary or lawyer Provincial/territorial authority Corporate documents (certificate of incorporation, certificate of status) Corporate registry Certified copy from the registry or notarized copy Provincial authority (or Global Affairs Canada for federal corporations, depending on the document) Court documents Court Certified copy from the court registry Depends on the court Rules differ between provinces, and they change, so treat this table as a starting point and confirm the current requirements with the issuing office. Step 5: Submit Your Application to the Correct Authority Once your document is ready, you’ll submit it to the right authority along with the following: Some authorities accept mail-in or courier submissions. Others offer in-person drop-off. A few have online systems. Check what your office currently accepts, because options change. Keep copies of everything you submit, and use a tracked courier if you’re sending originals. Step 6: Wait for Processing and Check the Apostille Processing times vary by authority and by time of year. Busy periods, such as the start of the school year or immigration deadlines, can add delays. Don’t leave this until the last minute. Build in extra time for ordering documents, notarization, processing, and return shipping. When your document comes back, check that: If anything looks off, contact the issuing office right away. Once you’ve sent the document abroad, fixing mistakes gets much harder. Step 7: Send It to the Destination and Confirm They’ll Accept
Corporate Compliance Checklist for Small Businesses in Canada

Most small business owners don’t get into trouble because they did something shady. They get into trouble because a deadline slipped by, a form never got filed, or nobody updated the corporate records after a change. It’s boring work, and it’s easy to push aside when you’re busy running the business. But compliance problems tend to show up at the worst times: when you’re selling the company, applying for a loan, bringing on a partner, or dealing with a CRA letter. This checklist walks you through what Canadian small businesses need to stay on top of, in plain language, so nothing catches you off guard. The Short Answer: What Does Corporate Compliance Involve? Corporate compliance for a Canadian small business means meeting your legal obligations in five areas: annual corporate filings, up-to-date corporate records (your minute book), tax and payroll filings, licences and permits, and employment and privacy rules. Which rules apply depends on whether you incorporated federally or provincially, and on your industry and location. Missing these can lead to late fees, loss of good standing, personal liability for directors, and in serious cases, dissolution of the corporation. Why Compliance Matters More Than Most Owners Think A corporation is a separate legal entity. That separation is what protects your personal assets, but it only holds up if the company is run like a real, separate entity. Courts can look past the corporate structure when records are missing, money is mixed with personal funds, or formalities are ignored. Compliance also affects practical things: Step 1: Confirm Which Rules Apply to You Before anything else, know where your corporation lives. Federal corporations are incorporated under the CBCA and deal with Corporations Canada. Provincial corporations are incorporated under a provincial act (Ontario’s Business Corporations Act, for example) and file with the provincial registry. Both types also have to follow federal tax rules, and both need to register to carry on business in each province where they operate. If you’re not sure which type you have, check your certificate of incorporation. It names the statute you were incorporated under. This matters because deadlines, forms and fees differ. Everything below is general guidance for Canada, so check the details for your province. Step 2: Keep Up With Annual Corporate Filings Every corporation has to file some kind of annual update with its registry. It confirms your address, directors and officers. Two habits help here. First, put the filing deadline in your calendar the day you incorporate. Second, file a change notice whenever directors, officers or your registered office address change. Most registries require this within a set number of days (often 15), and it’s separate from the annual return. Skipping annual returns is one of the most common reasons corporations get flagged. Registries can and do dissolve corporations for repeated non-compliance, and reviving one is more expensive than filing on time. Step 3: Maintain Your Minute Book Your minute book is the official record of the corporation. Think of it as the company’s paper trail (today, usually a digital one). It should include: The mistake I see most often is that owners incorporate, put the documents in a drawer, and never touch them again. Then a share gets issued informally, a director leaves, or a dividend gets paid, and none of it is documented. Whenever something significant happens, such as issuing shares, appointing a director, paying dividends, taking on major debt or selling a big asset, there should be a resolution on file. Keep corporate records for the life of the company. Under the CBCA, records must be kept at your registered office or another place in Canada, and you should be able to produce them promptly. Step 4: Hold Annual Meetings or Sign Written Resolutions Corporations have to make certain decisions every year. For CBCA corporations, that includes holding an annual shareholders’ meeting (within 15 months of the last one, and no later than six months after your financial year-end), presenting the financial statements, electing directors, and dealing with the auditor question. The good news: most small, closely held corporations don’t hold a real meeting. Instead, all shareholders sign written resolutions that cover the same business. It’s faster and just as valid, as long as it’s done properly and kept in the minute book. On the audit question, many small non-distributing corporations can skip a formal audit if all shareholders agree in writing. That consent needs to be renewed each year, so don’t assume last year’s still applies. Step 5: Keep Your Register of Individuals With Significant Control Current This one is newer and often missed. Federal corporations must keep a register of individuals with significant control (ISC), which are people who own or control 25% or more of the voting shares or of the fair market value of all shares, or who have significant influence over the corporation in other ways. Since January 2024, ISC information for federal corporations is also available through a public registry maintained by Corporations Canada, and the information is updated through the annual return. Some provinces have introduced their own beneficial ownership rules as well, so check what your province requires. Keep the register accurate. Update it within the required timeframe when ownership changes, and take reasonable steps to confirm the information is correct. Step 6: Stay Current on Tax Compliance This is where the penalties add up fastest. The Canada Revenue Agency (CRA) has strict deadlines and doesn’t treat “I forgot” as a reason to waive them. Corporate income tax (T2). Your T2 return is due six months after your fiscal year-end, even if you owe nothing. Any balance owing is due earlier: two months after year-end, or three months for many Canadian-controlled private corporations that qualify. A late T2 return generally triggers a penalty of 5% of the balance owing plus 1% for each full month late, up to 12 months. GST/HST. You must register once your taxable revenues pass $30,000 over four consecutive calendar quarters. Your filing frequency (monthly, quarterly or annually) depends
Ontario Landlord and Tenant Board Guide: Rights & Eviction Rules

The Ontario residential rental market is more complex and fast-moving than ever before. Whether you are a property owner trying to protect a major financial investment or a tenant trying to secure a safe place to live, navigating the relationship between landlords and tenants can feel like walking through a legal minefield. At the center of this ecosystem is the Ontario Landlord and Tenant Board (LTB). The LTB is the specialized administrative tribunal tasked with resolving residential tenancy disputes, evictions, and rent issues across the province. However, entering the LTB system unprepared is a massive risk. Due to historically high case backlogs, a single procedural mistake—such as picking the wrong form, missing a notice deadline, or failing to calculate dates correctly—can instantly get your case thrown out, forcing you to restart a process that takes months. If you are currently facing a rental dispute, understanding the legal framework is your best line of defense. This comprehensive guide breaks down how the LTB works, outlines critical rules for both sides, and explains how partnering with professional paralegal services in Brampton can safeguard your legal rights. Understanding the Foundation: The Residential Tenancies Act (RTA) To understand the Landlord and Tenant Board, you must first understand the law it enforces: the Residential Tenancies Act, 2006 (RTA). The RTA is the overriding piece of legislation that dictates the legal rights, safety responsibilities, and financial obligations of both parties in a residential tenancy. Crucial Legal Note: The RTA is an incredibly strict statute. Even if a landlord and a tenant sign a custom lease agreement containing clauses that contradict the RTA (for example, a clause stating “No Pets Allowed” or requiring a tenant to pay for all major property repairs), those clauses are automatically null and void under Ontario law. The RTA always takes precedence. Does the RTA Apply to Your Situation? While the vast majority of residential rental units in Ontario are governed by the RTA, there is a massive exception that frequently catches people off guard: Shared Living Spaces. If a tenant shares a kitchen or a bathroom with the property owner (the landlord) or a close family member of the owner, the tenancy is not covered under the RTA. Instead, it is considered a common-law commercial arrangement or rooming agreement. In these situations, disputes do not go to the LTB; they are handled through the Small Claims Court or basic contract law. For standard tenancies that do fall under the RTA, friction points typically emerge from four distinct areas: Dealing with these problems requires intense attention to legal detail. Let’s look at how both landlords and tenants can navigate these challenges without breaking the law. The Landlord’s Blueprint: Notices, Evictions, and Legal Compliance Being a landlord in Ontario is a highly regulated business endeavor. You cannot simply lock a tenant out, cut off their utilities, or seize their belongings if a conflict arises. Doing so constitutes an illegal eviction, which carries steep financial penalties from the LTB. To legally terminate a tenancy or recover unpaid funds, landlords must follow a rigid, multi-step process driven entirely by official documentation. [Proper Form Issued] ➔ [Notice Period Passes] ➔ [File LTB Application] ➔ [Attend LTB Hearing] ➔ [Enforcement via Sheriff] The Power of the Right Form (and the Danger of Errors) The LTB will dismiss an eviction application instantly if the initial notice contains typographical errors, structural mistakes, or math miscalculations. Landlords must be completely certain they are utilizing the absolute latest versions of official board documents. The two most common notices landlords encounter include: N4 Notice: Early Termination for Non-Payment of Rent If a tenant fails to pay rent on the day it is due, a landlord can serve an N4 notice the very next day. N12 Notice: Eviction for Personal Use by Landlord or Purchaser An N12 notice is issued when a landlord genuinely requires the rental unit for their own residential use, the use of immediate family members, or a buyer who has signed a formal Agreement of Purchase and Sale. Because the stakes are so high and the timelines are so precise, securing professional oversight from a dedicated Paralegal Landlord and Tenant Board (LTB) Services provider is highly recommended before you serve any paperwork to a tenant. The Tenant’s Shield: Protecting Rights, Privacy, and Security of Tenure Tenants in Ontario enjoy some of the strongest legal protections in North America. Chief among these is security of tenure. This means that a tenancy does not automatically end when a fixed-term lease expires. Instead, it seamlessly rolls over into a month-to-month tenancy under the exact same terms, and the landlord cannot force a tenant to sign a new lease or move out without an explicit legal reason recognized by the RTA. As a tenant, you have specific paths to protect yourself against landlord overreach. The Right to Reasonable Enjoyment and Privacy Landlords own the physical brick-and-mortar property, but tenants pay for the right to exclusive possession and quiet enjoyment. Spotting and Fighting “Bad Faith” Evictions With rental rates climbing across Ontario, some landlords are tempted to use “bad faith” tactics to evict long-term tenants paying below-market rent. A common tactic is serving an N12 notice for personal use, only to list the property back on public real estate sites for hundreds of dollars more a few weeks later. If you suspect an eviction notice is fraudulent, you have the right to stay in the unit and wait for an LTB hearing, where the landlord will be legally forced to prove their intent under oath. If you have already moved out and subsequently discover the landlord acted in bad faith, you can file a T5 Application within one year of moving out. If the LTB rules in your favor, they can order the landlord to pay you massive compensation, including up to a full year’s worth of your old rent, your moving costs, and the difference in rent at your new home. The LTB Hearing Process: Step-by-Step When an issue cannot be resolved
Why You Need Professional Paralegal Services in Brampton

Legal issues have a way of sneaking up on us when we least expect it. One day everything is fine, and the next, you’re a small business owner chasing down an unpaid invoice, a landlord dealing with a nightmare tenant, or a driver looking at a massive traffic ticket that threatens your insurance rates. When that happens, the legal system in Ontario can feel like a maze. Between confusing jargon, strict filing deadlines, and complex board rules, trying to handle things on your own can feel completely overwhelming. It’s incredibly easy to make a tiny paperwork mistake that throws off your entire case. If you live or run a business in the Peel Region, working with professional paralegal services in brampton ontario is often the smartest, most affordable way to protect yourself and get a fair result. At HK Legal Services, led by licensed paralegal Harpreet Kaur, we take the stress out of the law. We break down the walls of legal jargon so you can figure out your next moves with absolute confidence. Let’s look at exactly what a licensed paralegal can do for you and how we help people across Brampton protect what matters most. What Exactly Is a Licensed Paralegal in Ontario? There is still a lot of confusion out there about the difference between a lawyer and a paralegal. In Ontario, the system is unique. The Law Society of Ontario (LSO) regulates and licenses paralegals to provide independent legal services in specific areas of law. Unlike other places where a paralegal can only work behind the scenes for a lawyer, an Ontario licensed paralegal can represent you directly in small claims court, traffic courts, and various tribunals. Why Do People Choose a Paralegal? The Legal Matters We Handle for You When you’re looking for paralegal services in brampton ontario, you want to make sure your representative has actual, hands-on experience with your specific issue. Here is where the team at HK Legal Services shines: 1. Small Claims Court Brampton The Small Claims Court handles civil disputes where the money or property involved is worth $35,000 or less. This usually includes things like: Even though Small Claims Court is meant to be a simplified version of higher courts, the actual process is still full of rules. From drafting formal defenses to showing up at mandatory settlement conferences, we handle the heavy lifting so your evidence is clear, organized, and hard to argue with. 2. Landlord and Tenant Board (LTB) Matters Brampton’s rental market moves fast, and disagreements happen all the time. The rules under Ontario’s Residential Tenancies Act are incredibly strict, and the Landlord and Tenant Board (LTB) expects them to be followed perfectly. We represent both sides with fairness and grit, making sure your paperwork is bulletproof and your voice is heard at LTB hearings. 3. Traffic Tickets & Provincial Offences Getting a traffic ticket can feel like a minor annoyance until you realize what it actually costs you over time. Convictions under the Provincial Offences Act can quickly trigger: Before you just pay a ticket—which is the same as pleading guilty it’s smart to talk to a professional. Often, we can find a path to get the charges dropped, reduced, or negotiated down. We regularly represent drivers at the Brampton Court of Justice to protect their driving records. 4. Minor Criminal Offences (Summary Convictions) In Ontario, licensed paralegals can defend individuals against what are called “summary conviction offences” minor criminal charges where the maximum penalty is six months or less in jail. This includes things like minor property damage or minor theft. We help you navigate these highly stressful situations to protect your future, your record, and your career. 5. Workplace and Disability Boards (WSIB & ODSP) If you are dealing with a workplace injury or trying to access disability support, the fight doesn’t happen in a regular courtroom. It happens before administrative boards. We help clients navigate the paperwork and the appeals processes for both the Workplace Safety and Insurance Board (WSIB) and the Ontario Disability Support Program (ODSP). How We Work: What to Expect When you hand a legal issue over to someone else, you shouldn’t be left wondering what’s happening behind closed doors. We use a transparent, step-by-step approach to keep you in the loop from start to finish. 1.The Consultation:Step 1. We sit down (or connect virtually) to look over your documents whether that’s a contract, a lease agreement, or a ticket. We’ll give you an honest, realistic breakdown of your options. 2.Building the Strategy:Step 2. We dive into the specific laws and past cases that match your situation. Every case is unique, so we build a strategy customized for you and the local Brampton courts. 3.Handling the Paperwork:Step 3. We draft all the legal documents, claims, or applications, ensuring they are entirely accurate. Then, we handle serving them to the other party and filing them with the court clerks on time. 4.Negotiations:Step 4. Before going to an official trial, there is almost always a chance to talk. We represent you during settlement conferences and pre-trials, aiming to find a faster, less expensive resolution if possible. 5.The Hearing:Step 5. If the other side won’t budge, we step into the courtroom or tribunal hearing with you. We present the evidence, cross-examine witnesses, and argue your case directly to the judge or adjudicator. Need a Document Notarized? We Can Help. Legal needs aren’t always about disputes; sometimes you just need to make a document official. Harpreet Kaur is a licensed Commissioner of Oaths and Notary Public in Brampton. If you need help verifying paperwork for court, government applications, or business matters, you can visit us at 241 Clarence St, Unit 27, Brampton for quick and reliable service with: Why Choose HK Legal Services? We know you have a choice when looking for legal help in Brampton. Here is why our clients trust us: Just a quick heads up: Under Ontario law, paralegals cannot handle family law matters (like divorces or child custody)
Do You Need a Lawyer for an Ontario Tribunal?

When faced with a legal dispute before an Ontario administrative tribunal, one of the first and most critical questions you will ask yourself is: Do I need to hire a lawyer? Whether you are a landlord attempting to resolve a tenancy conflict, an individual contesting a license suspension, or a worker appealing a benefit decision, standing before an adjudicator can feel intimidating. The administrative legal framework in Ontario is complex, and the outcome of a hearing can carry severe financial, personal, or professional consequences. The short answer is no you are not legally required to hire a lawyer for an administrative tribunal hearing in Ontario. You have the right to represent yourself, or you can hire a Law Society of Ontario (LSO) licensed paralegal to represent you. This comprehensive guide breaks down how Ontario administrative tribunals operate, the key differences between hiring a lawyer versus a licensed paralegal, the hidden risks of self-representation, and how to choose the right legal advocate for your specific case. Understanding Administrative Tribunals in Ontario Administrative tribunals are quasi-judicial bodies created by federal or provincial legislation to resolve specific legal disputes outside the traditional court system. Unlike the Ontario Superior Court of Justice, tribunals focus on specialized areas of law and public policy. Tribunals were designed to be more accessible, efficient, and flexible than traditional courtrooms. However, their decisions are legally binding and carry the exact same legal weight as a formal court order. Some of the most active administrative bodies in Ontario include: Your Legal Options for Tribunal Representation Under Ontario law, anyone appearing before an administrative tribunal has three choices for legal representation: Understanding the scope of authority, cost structures, and specialized knowledge of each option is essential to making an informed decision. Lawyers vs. Licensed Paralegals in Ontario Ontario possesses a unique legal regulatory model. Unlike many other jurisdictions, Ontario fully regulates paralegals as independent legal practitioners through the Law Society of Ontario (LSO). Licensed paralegals are held to rigorous professional ethics, must maintain professional liability insurance, and are legally authorized to provide legal advice, draft legal documents, and represent clients before administrative tribunals. 1. Scope of Practice 2. Cost and Fee Structures 3. Specialized Expertise Because tribunals operate under distinct procedural rules (such as the Statutory Powers Procedure Act and tribunal-specific rules of practice), day-to-day experience matters immensely. A licensed paralegal who appears before the LTB or LAT weekly often possesses deeper tactical familiarity with specific adjudicators, practice directions, and board procedures than a lawyer whose primary focus is Superior Court litigation. Direct Comparison of Representation Choices Comparing your representation options across key factors highlights how each choice aligns with your budget and case complexity. Comparison Factor Self-Representation Licensed Paralegal Lawyer Legal Authorization Full right to represent self Authorized by Law Society of Ontario Authorized by Law Society of Ontario Cost / Investment $0 in fees (Filing fees only) Cost-effective / Flat-fee options Higher hourly rates Procedural Knowledge Self-taught / High risk of error Specialized in tribunal procedures Comprehensive legal background Evidence Preparation Responsibility of individual Professional gathering & assembly Professional gathering & assembly Best Suited For Simple, uncontested matters Most tribunal hearings (LTB, LAT, HRTO) Multi-jurisdictional / Superior Court appeals The Hidden Risks of Self-Representation Many individuals choose to represent themselves because administrative tribunals advertise informal rules compared to traditional courtrooms. However, “informal” does not mean “without rules.” Tribunal adjudicators must remain neutral referees. They cannot give you legal advice, help you frame your arguments, or overlook missed evidentiary deadlines. 1. Missing Mandatory Deadlines Tribunal schedules are governed by strict statutory timelines. Whether filing a tenant application, submitting a response to a license refusal, or requesting a reconsideration, missing a deadline by even 24 hours can result in your case being permanently dismissed without a hearing. 2. Submitting Inadmissible Evidence To persuade an adjudicator, your evidence must be properly organized, served on the opposing party according to procedural rules, and legally admissible. Unrepresented litigants frequently bring unverified text screenshots, incomplete bank statements, or hearsay statements that the tribunal refuses to consider. 3. Inability to Conduct Effective Cross-Examination Presenting your story is only half the battle. During a contested hearing, you must cross-examine the opposing party and their witnesses. Cross-examination requires strategic questioning, exposing contradictions, and challenging credibility skills that take years of legal training to master. 4. Relying on Emotion Rather Than Administrative Law Adjudicators do not rule based on emotional appeals or general perceptions of fairness. Rulings are based strictly on statutory interpretation, regulations, and legal precedents. Without a clear legal framework, self-represented arguments often fail to convince the tribunal. When Should You Hire a Licensed Paralegal? Retaining a licensed paralegal is ideal for the vast majority of administrative tribunal matters in Ontario. You should strongly consider professional legal representation if: When Might You Need a Lawyer Instead? While paralegals handle most tribunal hearings effectively, certain situations warrant retaining a lawyer: What to Expect When Working with a Tribunal Advocate When you retain professional representation for your tribunal hearing, your legal advocate handles the strategic and operational heavy lifting. Partnering with HK Legal Services for Your Tribunal Hearing Navigating an administrative tribunal dispute does not have to be a stressful or solitary experience. Having knowledgeable legal representation levels the playing field and ensures your rights are protected from day one. At HK Legal Services, our team provides dedicated advocacy across Brampton and the Greater Toronto Area (GTA). We specialize in administrative law proceedings, offering strategic advice and practical representation tailored to your unique circumstances. Whether you are preparing for a hearing before the Landlord and Tenant Board, contesting a matter at the Licence Appeal Tribunal, or seeking guidance on how to move forward, our licensed professionals are ready to assist. To learn more about how we can support your case, explore our comprehensive administrative tribunal representation services or contact our Brampton team to schedule a consultation.
How to Appeal an Ontario Tribunal Decision

Receiving an adverse decision from an administrative tribunal in Ontario can feel overwhelming. Whether you are a landlord dealing with an unfair order from the Landlord and Tenant Board (LTB), an injured worker navigating a Workplace Safety and Insurance Appeals Tribunal (WSIAT) denial, or an individual contesting a Licence Appeal Tribunal (LAT) ruling, an unfavorable result does not have to be the end of the road. Ontario’s administrative justice system provides clear legal mechanisms to challenge, review, and appeal decisions made by adjudicators. However, administrative law operates under strict statutory rules, narrow grounds for review, and unforgiving deadlines. This comprehensive guide breaks down how to appeal an Ontario tribunal decision, the critical differences between internal reconsiderations, statutory appeals, and judicial reviews, and how working with an experienced licensed paralegal in Brampton can safeguard your rights throughout the process. Understanding Administrative Tribunals in Ontario Administrative tribunals are independent, quasi-judicial bodies created by federal or provincial statutes to resolve specific types of legal disputes outside the traditional court system. Unlike judges in the Superior Court of Justice, tribunal adjudicators (often called board members or tribunal members) specialize in dedicated areas of regulation and public policy. In Ontario, tribunals render thousands of life-altering decisions every month. Some of the most common tribunals include: While tribunals were designed to be less formal than civil courtrooms, their rulings carry full legal weight. If a tribunal member makes an error of fact, an error of law, or breaches procedural fairness, you have the right to challenge that outcome through proper legal channels. 3 Legal Pathways to Challenge a Tribunal Ruling Challenging a tribunal ruling is not simply a matter of asking for a “redo” because you disagree with the outcome. Under administrative law, you must select the correct legal pathway based on the tribunal’s specific governing legislation. The three primary methods to overturn or adjust an administrative decision in Ontario are Internal Reconsideration, Statutory Appeal, and Judicial Review. Pathway 1: Request for Reconsideration (Internal Review) Before taking a matter to court, most Ontario tribunals provide an internal mechanism to ask the tribunal to review its own decision. This is commonly called a Request for Reconsideration or a Request for Review. What is a Reconsideration? A reconsideration asks the tribunal Chair or a senior member to re-examine an adjudicator’s order. Reconsideration is a discretionary remedy, meaning the tribunal is not required to grant a new hearing unless strict legal threshold tests are met. Grounds for Reconsideration Simply being unhappy with the result will lead to an immediate dismissal of your request. Valid grounds generally require showing: Time Limits Deadlines for filing a Request for Reconsideration are tight. For example: Pathway 2: Statutory Appeal to Court A statutory appeal occurs when the enabling legislation (the specific law governing the tribunal) explicitly creates a legal right to appeal the tribunal’s order directly to an appellate court typically the Ontario Superior Court of Justice (Divisional Court). How Statutory Appeals Work Unlike a reconsideration, a statutory appeal moves your case out of the administrative tribunal system and into the formal court structure. Most legislation restricts appeals strictly to questions of law. This means the court will not retry your case, re-hear witness testimony, or reassess facts unless the tribunal completely misapplied Ontario statute or binding common law precedents. Key Characteristics: Pathway 3: Application for Judicial Review When a tribunal’s governing statute does not provide a right of statutory appeal, or after internal reconsideration remedies are exhausted, the remaining option is an Application for Judicial Review. What is Judicial Review? Judicial Review is an extraordinary legal remedy heard before a panel of judges in the Divisional Court. Under Ontario’s Judicial Review Procedure Act (JRPA), the court reviews the administrative body’s exercise of statutory power to ensure it acted within its legal authority, acted reasonably, and respected constitutional rights. The Legal Standards of Review The court evaluates the decision using standardized legal frameworks: Judicial review applications must generally be filed within 30 days of the final decision. Direct Comparison of Appeal Pathways Understanding which legal tool fits your situation prevents wasted time and unnecessary legal expenses. Legal Mechanism Where It Is Filed Primary Focus / Grounds Typical Filing Deadline Request for Reconsideration Original Administrative Tribunal Severe procedural defect, new key evidence, or major error of law 15 to 30 Days (Tribunal specific) Statutory Appeal Superior Court of Justice (Divisional Court) Misinterpretation of statutes or binding legal precedents (Questions of Law) 30 Days from order date Judicial Review Divisional Court Unreasonable decisions, lack of jurisdiction, or breach of procedural fairness 30 Days under the JRPA Common Grounds for Overturning a Tribunal Decision To successfully challenge a tribunal order, you must frame your argument around recognized administrative law principles. A general sense that a decision was “unfair” will not convince an appellate panel or tribunal Chair. 1. Breaches of Procedural Fairness & Natural Justice Administrative bodies must follow fair procedures. A breach of natural justice occurs when an adjudicator denies a party their fundamental right to present their case or respond to the opposing side. Examples include: 2. Errors of Law An error of law happens when an adjudicator misunderstands, misinterprets, or misapplies a statute, regulation, or binding judicial precedent. Examples include: 3. Unreasonable Findings of Fact While courts respect tribunal findings of fact, a decision can be set aside if it is completely unsupported by the evidence. An outcome is unreasonable if the adjudicator made arbitrary conclusions, ignored uncontradicted material evidence, or reached a result that fails to provide a logical, coherent chain of reasoning. Step-by-Step: How to Prepare Your Tribunal Appeal If you have received an unfavorable order, acting quickly and systematically is essential to meeting strict statutory deadlines. Step 1: Secure the Official Written Order and Reasons Do not rely on oral statements made by an adjudicator at the end of a hearing. Request the formal written order along with the tribunal’s complete written reasons. The deadline clock typically starts on the date the written order is issued or received. Step